
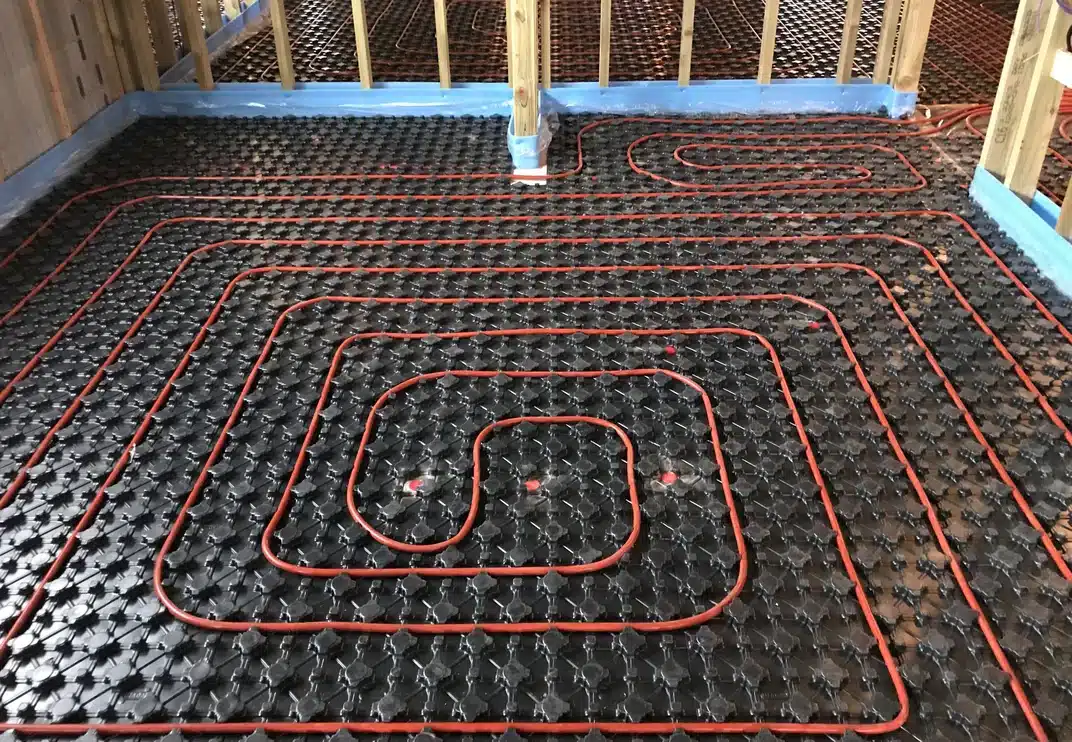
Most Dutch homes still heat with radiators on a gas boiler. That setup works – until the boiler needs replacing, energy costs go up again, or you renovate the floor and realise this was your one chance to switch to something better.
Underfloor heating distributes warmth through the floor itself. The room heats from the ground up, evenly, with no cold spots near windows and no radiators taking up wall space. It runs at lower water temperatures than radiators, which makes it the natural partner for a heat pump – and in the Netherlands, where new gas connections have been prohibited since 2018, that matters more every year.
Grand Renovation installs both water-based and electric underfloor heating systems across the Randstad and central Netherlands. We handle the full scope: floor preparation, pipe or mat installation, manifold setup, screed or dry-build finish, and connection to your existing boiler or heat pump. This page covers how both systems work, what they cost, and how to decide which one fits your project.
Water-Based vs Electric Underfloor Heating – Which One Do You Need?
The question is not which system is “better.” Each solves a different problem.
Water-based (hydronic) underfloor heating uses plastic pipes (PEX or PE-RT) embedded in or beneath the floor, carrying warm water from a boiler or heat pump. It heats large areas efficiently at low running cost. This is the system you want for whole-house heating – living rooms, hallways, bedrooms, kitchens. The installation is more involved: pipes need to be laid in loops, connected to a manifold (verdeler), and covered with screed or a dry-build system. Typical flow temperatures range from 30–45°C, which is ideal for heat pump operation.
Electric underfloor heating uses thin resistive cables or heating mats placed directly under tiles or laminate. Installation is faster and simpler – no manifold, no plumbing connection. But the running cost is higher because you are converting electricity to heat at a 1:1 ratio (unlike a heat pump, which delivers 3–4 kWh of heat per 1 kWh of electricity). Electric systems make sense in smaller spaces – bathrooms, en-suites, a single tiled hallway – where you want floor warmth as a comfort feature, not as your primary heating source.
The decision matrix:
| Criteria | Water-based | Electric |
|---|---|---|
| Best for | Whole-house primary heating | Single rooms, bathrooms |
| Floor build-up needed | 60–80 mm (screed) or 20–30 mm (dry) | 3–8 mm |
| Running cost | Low (especially with heat pump) | Higher (direct electric) |
| Installation complexity | Higher – plumbing + screed | Lower – mat under tiles |
| Heat pump compatible | Yes, designed for it | Not applicable |
| Retrofit suitability | Moderate (dry systems help) | Good (minimal floor height) |
If you are renovating a full floor or building new, water-based is almost always the right choice. If you are tiling a bathroom and want warm feet without touching the heating system, electric makes more sense. We install both and will tell you which one fits during the initial site visit.
What Does Underfloor Heating Cost in the Netherlands?
Prices below reflect the current Dutch market (2025–2026) and include materials, labour, and 21% BTW. They assume standard installation conditions – a level subfloor, accessible manifold location, and no major structural modifications.
Water-based underfloor heating
| Room size | Milling method (into existing screed) | New screed system | Dry-build system (no screed) |
|---|---|---|---|
| 20 m² | €900 – €1,300 | €1,200 – €1,600 | €1,400 – €1,800 |
| 40 m² | €1,600 – €2,400 | €2,200 – €3,000 | €2,600 – €3,400 |
| 60 m² | €2,200 – €3,200 | €3,000 – €4,200 | €3,600 – €4,800 |
| 80–100 m² | €2,800 – €4,500 | €4,000 – €5,800 | €4,800 – €6,500 |
Price per m² ranges from roughly €43 to €90 depending on method and scale. Milling is cheapest but requires an existing screed floor thick enough to cut channels into. New screed adds floor height (typically 60–80 mm). Dry-build systems (e.g., Uponor Minitec, Rehau Rautherm S) keep build-up under 30 mm and work well in renovations where floor height is limited – but the panels cost more.
Electric underfloor heating
| Room size | Heating mat (under tiles) | Cable system |
|---|---|---|
| 5–10 m² (bathroom) | €350 – €650 | €400 – €700 |
| 15–25 m² (kitchen/hallway) | €700 – €1,200 | €800 – €1,400 |
Electric systems are cheaper to install but more expensive to operate. For a 10 m² bathroom used 3–4 hours per day, expect roughly €15–€25/month in electricity at current Dutch tariffs (~€0.25–0.30/kWh). That is acceptable for comfort heating. For a 60 m² living room it would be prohibitive – use water-based instead.
Costs not included above
The manifold (verdeler) and thermostat controls typically add €300–€600 per zone depending on the number of loops. Connecting to an existing boiler is usually straightforward – but if you are switching to a heat pump at the same time, budget separately for that (
Electric systems are cheaper to install but more expensive to operate. For a 10 m² bathroom used 3–4 hours per day, expect roughly €15–€25/month in electricity at current Dutch tariffs (~€0.25–0.30/kWh). That is acceptable for comfort heating. For a 60 m² living room it would be prohibitive – use water-based instead.
Costs not included above
The manifold (verdeler) and thermostat controls typically add €300–€600 per zone depending on the number of loops. Connecting to an existing boiler is usually straightforward – but if you are switching to a heat pump at the same time, budget separately for that (heat pump installation is a separate scope).
When Underfloor Heating Makes Sense – and When It Does Not
Not every Dutch home benefits equally from underfloor heating. Here is an honest assessment:
Strong fit:
- New-build homes – BENG compliance already requires low-temperature heating; underfloor heating is the standard choice.
- Full floor renovations – if the screed is being replaced anyway, adding pipes costs relatively little extra.
- House extensions – a new aanbouw is the perfect opportunity to install underfloor heating without disrupting the existing house.
- Heat pump installations – underfloor heating’s low flow temperature (30–45°C) matches heat pump output directly.
- Open-plan living spaces – large rooms without many internal walls are where underfloor heating performs best.
Poor fit:
- Individual rooms with no floor work planned – ripping out a perfectly good floor just to add underfloor heating rarely makes financial sense.
- Upper floors with thin constructions – weight limits may rule out wet screed systems; dry-build or electric are alternatives.
- Rooms with a lot of built-in furniture or fixed cabinetry – covered floor area does not emit heat; you need ~80% of the room’s floor area free for effective heating.
- Very small budgets with no plan to change the boiler – if you are keeping a high-temperature gas boiler and only heating one room, the return on investment is weak.
We assess every room individually during the site visit. If underfloor heating is not the right solution somewhere, we say so. Sometimes a single well-placed radiator does the job better.
How We Install Underfloor Heating – Step by Step
1. Site assessment and heat loss calculation. We measure each room, check floor construction and available height, identify the manifold location, and calculate the heat output needed per m². This calculation (warmteverliesberekening) determines pipe spacing (typically 100–150 mm), loop lengths, and required flow temperatures. Without this step, you end up with a system that either underheats the room or wastes energy. The assessment is free.
2. Floor preparation. Depending on the method: milling channels into existing screed, laying insulation boards (EPS or PIR, typically Rc ≥ 1.0) on the subfloor, or placing dry-build system plates. Proper insulation under the pipes is critical – without it, you heat the neighbour’s ceiling or the crawl space instead of your room.
3. Pipe installation. PEX or PE-RT pipes (typically 16 mm diameter) are laid in calculated loops, clipped to insulation boards or pressed into milled channels. Every loop returns to the manifold. Joints under the floor are not permitted by Dutch installation standards – each loop runs continuously from manifold to manifold.
4. Manifold (verdeler) installation. The manifold is the central distribution point. It controls water flow to each loop, allows individual room balancing, and connects to the heat source. We mount it in a utility cupboard, under the stairs, or in a purpose-built cabinet. Each circuit gets its own flow meter and shut-off valve.
5. Pressure testing. Before screed or floor finish goes on, we pressure-test the entire system at 6 bar for a minimum of 24 hours. This catches any leaks or fitting failures while everything is still accessible. We do not pour screed until the test is passed and documented.
6. Screed or floor finish. For wet systems: anhydrite or cement screed is poured over the pipes (minimum 45 mm cover). Drying time is 1–2 days per mm of thickness before the system can be gradually started. For dry-build systems: the system plates are covered with fibre-cement boards or gypsum fibreboard, and tiles or laminate go directly on top.
7. Commissioning and balancing. Once the floor is finished, we start the system gradually (raising temperature by 5°C per day), then balance each loop using the manifold flow meters. A properly balanced system delivers equal warmth across every room without one zone overheating while another stays cold.
The full installation – from floor prep to commissioning – takes 3–7 working days for a typical 60–100 m² ground floor in an existing home. New-build installations run in parallel with the construction schedule and add no time to the overall project.
Underfloor Heating and Heat Pumps – Why They Work Together
The Dutch government’s push away from natural gas means more homeowners are replacing gas boilers with heat pumps. This is where underfloor heating becomes particularly relevant.
A standard radiator system needs water at 65–75°C to heat a room. A heat pump produces water at 35–55°C – beyond that, its efficiency (COP) drops sharply. Underfloor heating works at exactly those lower temperatures because the entire floor acts as a giant, low-temperature radiator. The result: the heat pump runs at its most efficient point, and your energy bill stays manageable.
If you are considering a heat pump and do not have underfloor heating yet, the order of operations matters. Install the underfloor heating first (or at the same time as the heat pump), because retrofitting pipes into a finished floor after the heat pump is running means doing the disruptive work twice. We coordinate both installations when they are part of the same renovation – see our full range of construction and renovation services for how we handle multi-trade projects.
For homes that will keep their gas boiler for now but plan to switch later, we install systems that are already heat-pump-ready: correct pipe diameters, proper insulation values, and a manifold that accepts low-flow-temperature controls. When the heat pump goes in years later, the floor system needs no modifications.
Underfloor Heating vs Radiators – An Honest Comparison
The question comes up in almost every renovation conversation. Here is what actually differs:
Comfort. Underfloor heating wins. Heat rises from the floor, warming feet first, with no convection drafts and no hot-cold zones near and away from radiators. Multiple Reddit threads from Dutch homeowners confirm this – once you have lived with floor heating, radiators feel like a compromise.
Energy efficiency. Underfloor heating wins, but only with a low-temperature heat source. On a high-temperature gas boiler, the difference is modest (5–10% savings). With a heat pump, underfloor heating can reduce energy consumption by 20–30% compared to radiators, because the heat pump operates at a much higher COP at 35°C supply versus 65°C.
Installation cost. Radiators win. A new radiator in a room costs €200–€500 including installation. Underfloor heating in the same room costs €800–€2,000+ depending on method and size. The payback comes through lower energy bills over 10–20 years – or immediately if it enables a heat pump switch.
Responsiveness. Radiators win. A radiator heats a room in 15–30 minutes. Underfloor heating in screed takes 2–4 hours to bring a room up to temperature because of the thermal mass. That is fine if you keep the system running continuously (which is how it should be used), but if you want to heat a room quickly for occasional use, a radiator is better.
Space and aesthetics. Underfloor heating wins. No radiators on walls means more furniture placement options, cleaner walls, and no radiator covers. In small Dutch apartments and row houses where every square metre counts, this is a genuine advantage.
Our recommendation: If you are renovating the floor anyway, install water-based underfloor heating – especially if a heat pump is in your future. If you are keeping the existing floor and just need to heat a cold room, add a radiator. There is no single correct answer.
Frequently Asked Questions
How much does underfloor heating cost per m² in the Netherlands?
Water-based systems cost between €40 and €90 per m² installed (including materials, labour, and 21% BTW), depending on the installation method. Milling into existing screed is cheapest at €43–€55/m². Dry-build systems run €60–€75/m². New screed installations fall between €55–€70/m². Electric heating mats cost €35–€55/m² but are only suitable for small areas.
Can I install underfloor heating in an existing home?
Yes. Milling systems cut channels directly into your existing screed – no need to raise the floor. Dry-build systems add only 20–30 mm of height. Electric mats add as little as 3–5 mm. The feasibility depends on your current floor construction, which we assess during the free site visit.
Does underfloor heating work with my existing gas boiler?
It can. Most condensing boilers (HR-ketel) can supply water at 40–50°C, which is warm enough for underfloor heating. You may need to adjust the boiler settings and add a mixing valve if the boiler also feeds radiators at higher temperatures. We configure the system to match your heat source.
How long does installation take?
For a typical 60 m² ground floor renovation: 3–5 working days for pipe installation and screed. Add 3–6 weeks of drying time before the final floor covering can be laid (for cement screed; anhydrite screed dries faster). Dry-build systems skip the drying time entirely – the floor finish can go on within days.
Is underfloor heating bad for wooden floors?
Not if done correctly. Engineered wood flooring (multiplank) works well with underfloor heating – the layered construction is dimensionally stable. Solid hardwood is riskier: it can shrink and gap. The key is controlling the floor surface temperature (never above 27°C) and maintaining stable humidity. We advise on flooring compatibility during the design phase.
What happens if a pipe leaks under the floor?
This is extremely rare with modern PE-RT and PEX pipes – they have no joints under the floor and a lifespan exceeding 50 years. If a leak does occur, we locate it using thermal imaging, open only the affected section of floor, and repair it. In over [X] years of installations, we have had [X] leak call-backs.

